


Bookbinding
- Feb 24
- 4 min read
You'll find a theme in the art forms that I get excited about. It's practicality. There's something in being able to use an art piece that does something for me. Art for the sake of aesthetics alone is wonderful, but I'm partial to a tactile experience. To be able to wear or use something that you made not only opens crafting avenues, but you get to say, "Thank you, I made it!" when it's inevitably commented on. If you are able to make your own journals, for example, you don't have to buy a new journal every six months. There's a sense of independence I find whenever I'm able to make something instead of buying it. When you choose to make something instead of buying it, you get a project and a product.
I decided one Christmas to make everyone a handmade journal or sketchbook. I had wanted to make handbound books for quite a while, my Pinterest algorithm showing me more and more bookbinding crafts. I had never even tried it, so a couple YouTube videos and a small starter kit later, I was well on my way. I have a habit of just doing things, regardless of if I know what I'm doing or not. This makes for interesting outcomes, since I have minimal understanding of what something is 'supposed' to look like. My impatience knows no bounds, hence my propensity to start projects and learn as I go.
Recently I wanted to try what's called "perfect binding" which is what most books and journals are made with. This means that layers of adhesive (preferably bookbinding glue) hold the pages and cover together. I had previously only used a Coptic stitch in bookbinding since I did not have access to appropriate glues. I had the idea recently to buy used hardcover books, gut them, and fill them with blank paper instead. I chose three different sizes and three different kinds of paper to fit the needs of each one.
The first one I started with was small manual on how to take the perfect bath. I did not know that there were instructional books on how to bathe correctly, but here we are. I didn't want to use a binding method I had used before; I wanted something with rougher edges. I gutted the book and trimmed the covers so that I had two separate pieces for the front and the back, getting rid of the strip used as the spine.

I kept some of the original pages so that I could incorporate some of its unique elements. I used a hole punch and metal rings to put it together. I cut some toned pages from an old sketchbook to size. I liked the way the beige toned paper interacted with the original design on the book.


This is intended to be a small pocket notebook, something you could clip onto your bag and go.
Next, I started working on a medium sized book.

Once again, I kept some of the original pages and scattered them throughout. What drew me to this book was the color and size. It was originally the book titled "The Dot and the Line" by Norton Juster, an adaptation from the 1965 short film. It's a good size for a notebook, the pages just large enough to be able to fit full thoughts or notes. I wanted to keep the covers intact so I could use the glue method instead of stitching or clipping them together.
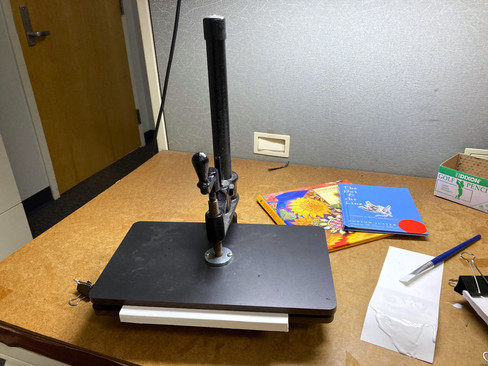
I used binder clips to keep the folios (a page folded in half) together and used book binding glue to secure them. Usually books are made of signatures, which is a group of folios folded together. But, since these books are smaller, the spines were not thick enough to hold multiple signatures. While they dried, I put paper for the third book in a book press (as seen below). I used binder clips instead of the book press for the medium sized book because I was excited and wanted both of them to be glued at the same time.
A book press does exactly what it sounds like. It presses the pages together, so the glue does not bleed between them. It keeps everything in place while the glue dries. I added three layers of glue to the folio spines, ensuring a solid hold. As seen below, I used a paintbrush to brush on the glue in thin layers, being careful not to get any on the top or bottom edges of the pages.


After the glue dried, it was time to secure them to their covers. To do this I coated the spine with glue and carefully lined the pages up. I pressed down, waiting for the glue to dry enough to be able to handle it without it coming undone. I then put a generous amount of glue on the inside of the cover, carefully distributing it to the edges. Taking the first and last pages, I smoothed them out over the glued covers, cementing them together. These are called the endpapers, typically you'll find they're different colors from the main pages; often, they have a decorative pattern on them. For this trial run/ experimental project, I used pages from the main block of paper. I then secured them with rubber bands so they could dry overnight, ensuring a more secure hold.

None of these came out exactly how I wanted them too, as is typical when trying a new method for anything. But with every project you complete, you learn something new to try next time. I plan on making many more bookbinding projects, if you would like to see more in-depth instructions, or even a video tutorial, leave a comment below.
Thank you for reading!


Love your crafts! Do you have an Etsy store or any where to buy your finished products?